
Share:

AI marketing & automation


Three WordPress SEO decisions are easy to get wrong and expensive to fix once content is live. The first is changing your permalink structure after publishing, which breaks every indexed URL and triggers a full redirect audit. The second is skipping Google Search Console verification, which delays indexing by weeks and leaves you blind to crawl errors. The third is treating schema markup as something to add “once the site is more established,” which means every post published before setup misses rich result eligibility from its first crawl.
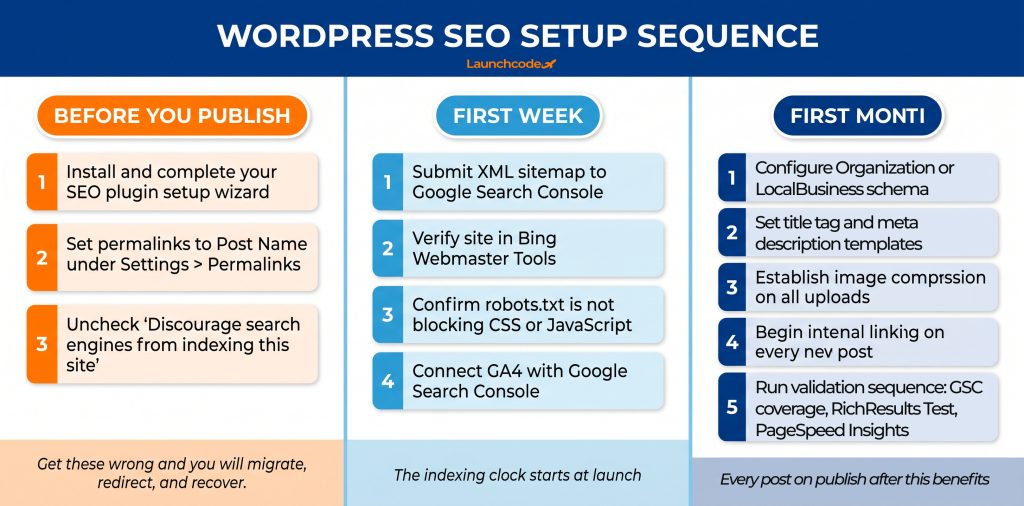
Most WordPress setup guides list steps without ranking them by importance. Some decisions are foundational. Others can wait. This guide covers the right setup sequence in the right order, from what you configure before publishing your first post through what you add in the first month, and explains what breaks if you do things out of sequence.
WordPress does not configure itself for search. The platform creates a working site, but crawlability, indexability, and performance are your responsibility. WordPress powers 43.4% of all websites online and roughly 1,000 new sites launch every single day. Most of them go live without completing the foundational SEO steps. That gap is a real competitive advantage for any site that gets the setup right before publishing anything.
WordPress handles publishing, theming, and navigation by default. It does not configure a clean URL structure, generate or submit an XML sitemap, install schema markup, or check that your search engine visibility settings are correct. You build those layers yourself, and the sequence matters because some decisions create dependencies for everything that follows.
The clearest example is permalink structure. If you publish 50 blog posts on default date-based URLs and then switch to a post-name structure, every URL on your site changes. Recovering the ranking history attached to those old URLs requires a 301 redirect for each one. Even with clean redirects, there is always a recovery window where traffic drops before it stabilizes. The same consequence applies to schema added retroactively and GSC verification that happens weeks after launch.
Google’s John Mueller made the governing principle clear in a November 2025 post on Bluesky. He wrote: “Consistency is the biggest technical SEO factor.” Consistency starts before your first page is published. Every decision you make at setup creates the baseline that every future optimization builds on.
Your SEO plugin, permalink structure, and search engine visibility status must be configured before any content goes live. These three decisions are foundational and hard to reverse once content is published. Changing them retroactively creates redirect work, recovery windows, and inconsistent signals across your site. The order below is intentional.
Your SEO plugin controls title tag templates, meta description output, XML sitemaps, schema markup, canonical tags, robots directives, and breadcrumb structure. It shapes how Google reads every page on your site. The choice matters, and running the full setup wizard immediately after activation matters just as much.
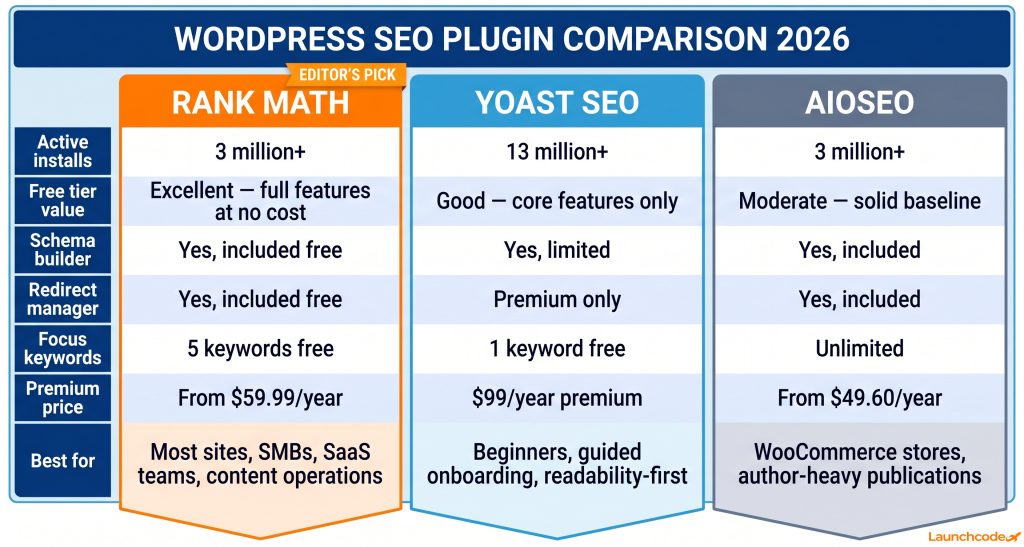
Three plugins dominate the WordPress ecosystem in 2026. Here is a direct comparison:
| Plugin | Who it fits | Key strength | Watch out for |
|---|---|---|---|
| Rank Math | Most sites, including SMBs, SaaS teams, and content-heavy operations | Full-featured free tier: schema builder, redirect manager, 404 monitor, five focus keyword slots | Setup wizard is detailed and takes 10 to 15 minutes to complete correctly |
| Yoast SEO | Beginners who want the most guided onboarding and strong readability analysis | 13 million active installs, extensive documentation, proven performance across all WordPress versions | Advanced features including redirect manager and multi-keyword targeting require a $99/year premium subscription |
| AIOSEO | WooCommerce stores and author-driven publications with strong E-E-A-T needs | WooCommerce product schema integration and author SEO module built in | Can feel heavyweight for simple sites. Pricing scales with site count |
For most new sites, Rank Math is the strongest choice. It delivers schema markup, redirect management, a 404 monitor, and five focus keyword slots at no cost. According to WordPress.org data, Rank Math grew to 3 million active installs in five years and holds a 4.9-star rating on WordPress.org. The install gap with Yoast reflects Yoast’s longer history, not a quality advantage.
After installing your chosen plugin, complete the full setup wizard before doing anything else. The wizard configures your site entity type (blog, business, or e-commerce), homepage title format, social profile connections, and default schema output. Skipping it means every title tag and schema type across your site defaults to a generic template that serves neither readers nor search engines.
WordPress defaults to URLs in the format yoursite.com/?p=123. That format tells Google nothing about the page’s content or topic. The SEO-recommended setting is Post Name, which produces clean, readable URLs such as yoursite.com/wordpress-seo-setup-guide.
Go to Settings > Permalinks in your dashboard. Select Post Name. Click Save Changes. Do this before you write a single post.
Avoid date-based structures such as /2026/06/post-title/. They lock the publication year into every URL, which visually dates your content in search results and creates redirect work every time you update or republish an article. They also make URL restructuring nearly impossible without breaking ranked pages.
“The most painful site recoveries I’ve worked on started with one decision: launching on date-based URLs. Migrating 200 posts to Post Name permalinks, setting up redirects, and waiting through the recovery window costs more time than getting the URL structure right before launch ever would.” — Tanner Medina, Co-Founder and Chief Growth Officer
If you are migrating a site that already uses date-based or custom permalink structures, keep the existing structure in place and plan a formal migration with proper 301 redirects. Do not switch formats without a redirect plan. A migration without redirects is a traffic loss event.
WordPress includes a native setting that blocks all search engine crawlers from accessing your site. It is designed for staging and development environments. It is frequently left enabled by mistake when a staging site is pushed to production.
Go to Settings > Reading and confirm that the checkbox labeled “Discourage search engines from indexing this site” is unchecked before you go live. This takes five seconds and prevents a scenario where your site functions perfectly in the browser but does not appear in any search results.
After launch, use the URL Inspection tool in Google Search Console to test your homepage. If it returns “URL is not on Google,” this setting is the first thing to check. It is the most common cause of a site that looks healthy but receives no organic traffic in its first weeks.
Google and Bing will not crawl your site reliably without a verified webmaster tool account in each platform and a submitted XML sitemap. Both should be configured within the first seven days of launch. Bing is not optional. ChatGPT retrieves search results directly from the Bing index. Skipping Bing submission means your site is invisible to one of the fastest-growing AI search traffic sources available.
Google Search Console is the direct communication channel between your site and Google. It tracks what Google has indexed, flags crawl errors, and confirms when your sitemap has been processed. Set it up in this order:
The Coverage report is the clearest indicator of whether your setup is working. A growing indexed count with few or no exclusions means crawling and indexing are functioning correctly. A high excluded count with reasons such as “Crawled, currently not indexed” signals content quality or site authority issues to investigate. Also connect GA4 with GSC inside Google Analytics to pull search query data directly into your traffic reports.
AI Overviews now appear on roughly 25% of all Google searches, and organic click-through rates dropped 61% on queries where an AI Overview appears. Perplexity AI, ChatGPT search, and Bing Chat all draw from the Bing index to generate answers. A site verified only in GSC is invisible to all of them.
“We added Bing Webmaster Tools to our standard launch checklist in 2025. Once ChatGPT search became a real referral source, that 15-minute setup became one of the highest-return items on the entire onboarding process.” — Tanner Medina, Co-Founder and Chief Growth Officer
Go to bing.com/webmasters and add your site. Bing allows you to import your GSC property directly, which speeds up verification. Submit the same XML sitemap URL you used in GSC. The process takes under 15 minutes and gives your site entry into the index that powers multiple AI-driven answer tools.
Your SEO plugin manages a virtual robots.txt file that instructs crawlers which parts of your site to access and which to avoid. The plugin defaults are usually correct, but confirm two things immediately after launch.
First, confirm that your plugin has not blocked CSS or JavaScript files. Blocking those files prevents Google from rendering your pages accurately, which reduces indexing quality. Second, confirm that your XML sitemap URL appears at the bottom of the file.
View your current robots.txt by visiting yoursite.com/robots.txt in a browser. The file should allow access to all content directories and explicitly disallow access to /wp-admin/. Most SEO plugins let you edit this file directly from the WordPress dashboard.
Core Web Vitals are Google’s three page experience ranking signals: Largest Contentful Paint (LCP), Interaction to Next Paint (INP), and Cumulative Layout Shift (CLS). Pages that pass all three rank 12% higher on average than pages that fail even one metric. Only 39% of websites currently achieve passing scores across all three. Your hosting plan determines the performance ceiling your site can realistically reach. No amount of plugin optimization compensates for an underpowered server.
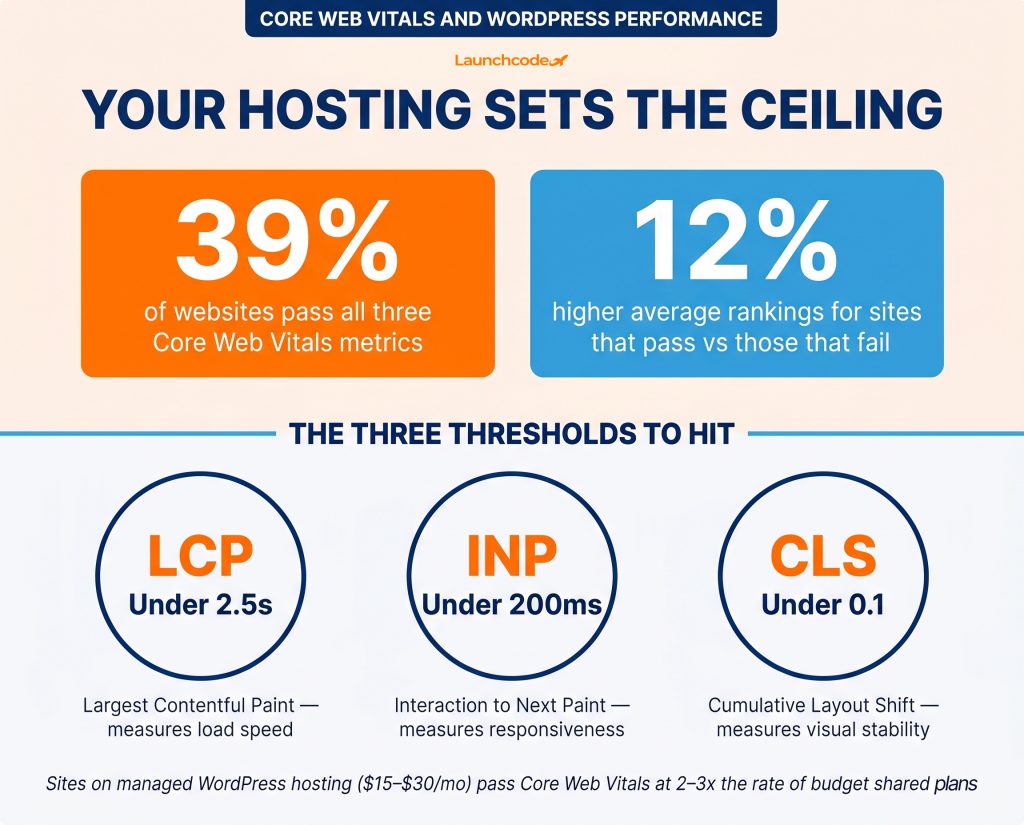
Budget shared hosting at $3 to $8 per month consistently produces Core Web Vitals failures. Server response times at this tier regularly exceed 600 milliseconds, which makes hitting the LCP threshold of 2.5 seconds or below nearly impossible. Google’s LCP measure starts from the moment a user requests your page. A slow server response eats most of that budget before your HTML even begins loading.
Mid-tier managed WordPress hosting in the $15 to $30 per month range from providers like Kinsta, WP Engine, or SiteGround’s higher tiers delivers faster server response times and better baseline performance. Sites on managed WordPress hosting pass Core Web Vitals at two to three times the rate of those on budget shared plans.
Add Cloudflare’s free plan from day one. It functions as a CDN by caching your content on servers distributed globally, reducing load times for users located far from your primary server. For caching and performance optimization, WP Rocket handles page caching, file minification, lazy loading, and database cleanup in a single plugin. It integrates with Cloudflare without manual configuration.
Google’s Core Web Vitals thresholds to target: LCP under 2.5 seconds, INP under 200 milliseconds, and CLS under 0.1. Failing any one of the three removes you from the 12% ranking advantage available to sites that pass all three.
Uncompressed images are the most common cause of LCP failures on WordPress sites. A single full-resolution hero image uploaded from a camera or design tool can push LCP past four seconds on mobile, failing the threshold by 60% or more.
Configure image optimization before importing your content library:
After setting up your first few key pages, run them through Google PageSpeed Insights. Look at the Opportunities section. It lists each image issue with an estimated performance saving in seconds, making it clear which images to address first.
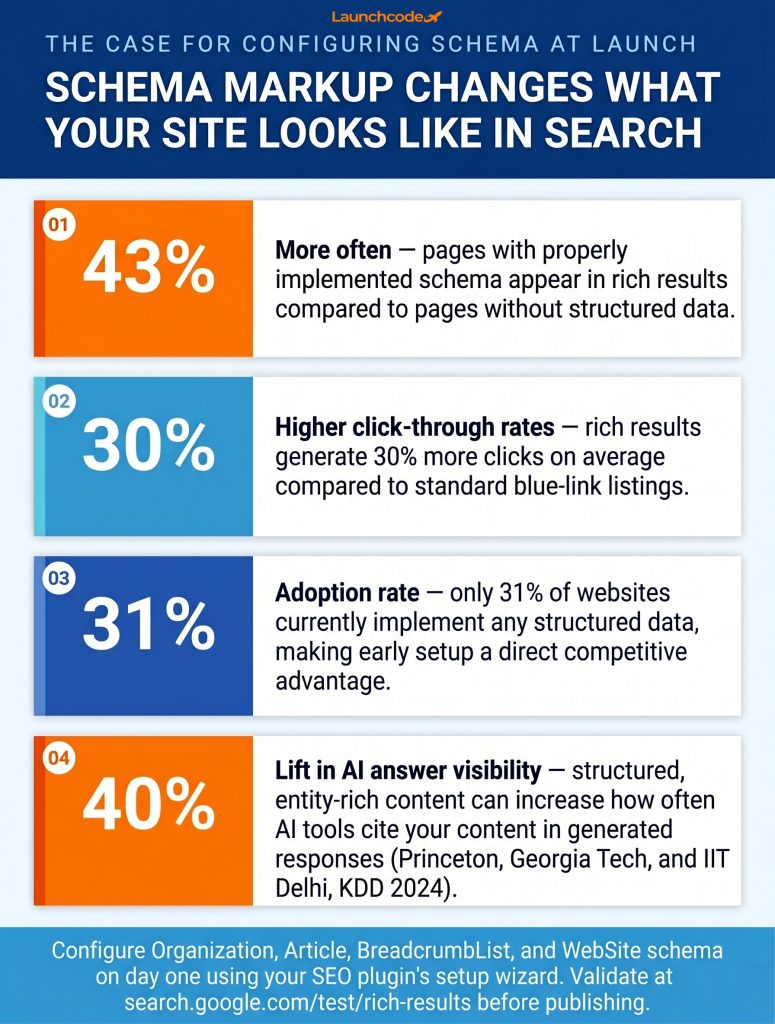
Schema markup is structured data written in JSON-LD format that tells search engines and AI systems what type of content is on your page, who created it, and which entities it covers. Pages with properly implemented schema appear in rich results 43% more often than pages without it. Rich results generate 30% higher click-through rates on average. Only 31% of websites currently implement any structured data at all. Configure schema at launch, not after your first 100 posts are published.
Your SEO plugin handles the most important schema types automatically once you complete the setup wizard. Confirm these are active after running the wizard:
For WooCommerce stores, enable Product schema through your plugin’s e-commerce module. Product schema adds price, availability, and review information directly to your search listings without additional markup work per product.
After completing setup, validate your output using Google’s Rich Results Test at search.google.com/test/rich-results. Enter your homepage URL and at least one post URL. Confirm the expected schema types appear without errors. Errors flagged in this tool prevent rich result eligibility even when markup is technically present in the page source.
“We validate schema output using Google’s Rich Results Test on every site we build. It’s the fastest way to catch output errors before a client publishes their first post and asks why rich results aren’t showing after 60 days.” — Derick Do, Co-Founder and Chief Product Officer
Google’s 2026 official documentation on generative AI optimization states: “Optimizing for generative AI search is optimizing for the search experience, and thus still SEO.” Schema markup is the most direct technical signal available to AI systems for determining whether your content is structured, entity-rich, and authoritative enough to cite in a generated response.
A 2024 research study from Princeton University, Georgia Tech, and IIT Delhi (Aggarwal et al., KDD 2024) found that adding structured content, citations, statistics, and explicit entity definitions can lift visibility in AI-generated answers by up to 40%. Schema is the technical implementation of that principle. It removes ambiguity about what your content covers and maps your site to the entities that AI systems rely on when generating answers.
At Launchcodex, schema configuration is part of every WordPress site build from day one. Schema applied at launch covers every post and page from its first indexed visit. Sites that implement schema retroactively after publishing hundreds of pages face reprocessing delays and patchy coverage across their content archive.
On-page SEO setup is not only about individual posts. It starts with site-level title tag and meta description templates that control how every page type appears in search results. Getting those templates right before publishing creates consistent signals across every piece of content from day one.
Configure title tag templates in your SEO plugin’s search appearance settings during initial setup. For most sites, these formats work consistently:
Keep title tags under 60 characters to avoid truncation. Avoid templates that append the year, include the word “welcome,” or stack category names before the post title. Each of those patterns adds length without adding relevance.
For meta descriptions, set a global fallback in the plugin, but write a unique description for every post before publishing. Target 140 to 155 characters. Include the primary keyword naturally and give the reader a specific reason to click. A description that names the exact outcome the post delivers outperforms a generic summary.
Confirm your title tag templates are working by using the Preview feature inside Rank Math or Yoast on a new post. The preview shows exactly how your title and description will appear in a Google listing, including character count warnings.
How you structure content inside WordPress posts affects both traditional rankings and AI-generated answer eligibility. Use a consistent heading hierarchy on every post:
Lead every post with a direct answer. The opening 150 to 200 words should answer the primary query immediately, not build toward the answer through context and background. AI systems that generate answers from indexed content consistently pull from opening sections. Saving the answer for paragraph four reduces AI search citation probability and reduces traditional featured snippet eligibility at the same time.
Write with specific data, named entities, and attributed sources throughout. Precision signals credibility to both readers and ranking systems. Content built on concrete facts is more likely to be cited by any search system, traditional or AI-driven. See our guide to GEO optimization and AI-first content structure for a deeper breakdown of how content structure decisions affect AI search visibility.
Internal links distribute authority across your site, guide crawlers to content that might otherwise be missed, and help readers navigate to related information. Set your internal linking approach before your post count grows large enough to make it unmanageable.
Set one rule from day one: every new post links to at least two existing posts using descriptive anchor text. Anchor text should describe the destination page’s topic specifically. Linking to a post about page speed with anchor text such as “Core Web Vitals optimization for WordPress” signals far more context to Google than “learn more” or “click here.”
Rank Math’s free tier includes basic internal link suggestions. Yoast offers a similar tool in its premium tier. Both surface related posts while you are writing, reducing the manual effort of tracking your linking opportunities.
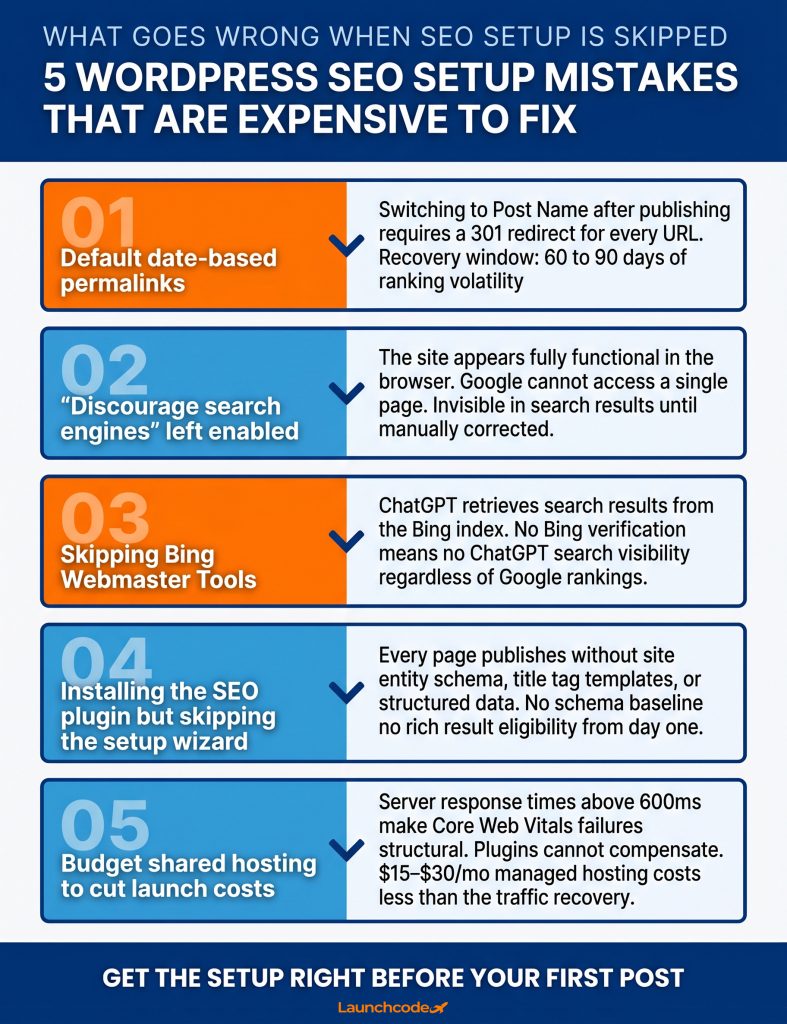
The mistakes below are common, often invisible for weeks, and consistently painful to clean up once content is published and ranked. Avoiding them is a matter of completing the right steps in the right order before any content goes live.
After completing setup, run a structured validation sequence before treating the configuration as finished. A clean GSC coverage report, valid schema output, and passing Core Web Vitals scores are the three signals that confirm your foundation is solid.
Use this validation sequence within 72 hours of launch:
Run this same sequence again 30 days after launch. By then, your crawl cycle has had time to process new content, GSC data is more reliable, and any indexing issues that develop after your first few posts become visible in the Coverage report.
Most WordPress sites launch without completing the foundational SEO steps. The consequence is not immediate. A site with no GSC verification still functions. A site with date-based permalinks still publishes content. Schema left unconfigured does not produce errors. The cost shows up later, in a URL migration project, a months-long indexing delay, or a rich result eligibility gap across the entire content archive.
The setup sequence in this guide is organized around consequence, not convention. Permalink structure and plugin configuration come first because changing them later has the highest recovery cost. GSC and Bing Webmaster Tools come in week one because the indexing clock starts at launch. Performance, schema, and content structure build on that foundation and grow in value with every post published after they are in place.
The goal is not a flawless site before the first piece of content goes live. The goal is a site that is crawlable, verified across both Google and AI search, schema-configured, and structured for GEO from the first indexed page. Every post you add after that benefits from the work you completed before it.
For teams that want the full WordPress SEO and GEO technical stack built correctly from the start, our SEO and GEO services cover site configuration, schema setup, performance optimization, and ongoing content structure as part of a complete engagement.
Rank Math is the strongest choice for most sites. It delivers schema markup, a redirect manager, a 404 monitor, and five focus keyword slots in the free version. Yoast SEO charges $99 per year for comparable features. AIOSEO is worth considering for WooCommerce stores that need product schema and author SEO built into a single tool.
Select Post Name under Settings > Permalinks before publishing any content. This creates URLs in the format yoursite.com/your-post-title, which is clean, readable, and keyword-relevant. Avoid the default numeric format (?p=123) and date-based formats (/2026/06/title/). Do not change your permalink structure after content is published without a complete 301 redirect plan in place.
Install an SEO plugin such as Rank Math or Yoast and complete the setup wizard. Both plugins generate an XML sitemap automatically. The URL is typically yoursite.com/sitemap_index.xml. Go to search.google.com/search-console, navigate to Sitemaps, and submit that URL. GSC will confirm receipt and begin processing within 24 to 72 hours.
Schema markup does not directly raise rankings. It tells search engines what your content covers and makes pages eligible for rich results, which are enhanced search listings that include star ratings, product prices, and other information. Pages eligible for rich results appear in those formats 43% more often than pages without schema, and rich results generate 30% higher click-through rates on average compared to standard listings.
ChatGPT’s search feature retrieves results from the Bing index. If your site is not indexed in Bing, it will not appear in ChatGPT search responses. Perplexity AI and Bing Chat also draw from the same index. Bing Webmaster Tools verification takes under 15 minutes and directly affects your site’s visibility across the AI search tools that are growing fastest in usage.
With a verified GSC account and a submitted XML sitemap, Google typically crawls a new site within three to seven days. Individual pages on new sites with low authority may take two to four weeks to appear in search results. Use the URL Inspection tool in GSC and click “Request indexing” on priority pages to speed up processing. Publishing quality content consistently increases your crawl frequency over time.
It is a checkbox under Settings > Reading that, when enabled, sends a meta noindex directive and a robots.txt disallow to all search engines. WordPress includes it for use during development. It must be unchecked before launch. A site with this setting enabled does not appear in any search results. The error is invisible in the browser, making it one of the most common and most damaging launch mistakes.


Real stories from the people we’ve partnered with to modernize and grow their marketing.